When you build backend applications with Laravel like Admin Panels, it would save you a ton of time if you use an Admin Template. One of the best free admin template you can use is AdminLTE. It provides the frontend view for your application so you can focus on the backend.
There are 2 ways you can integrate this template :
- Manually slicing from the downloaded zipped HTML template
- Using the jeroennoten/Laravel-AdminLTE package
We’ll be focusing on the second method for now since it’s cleaner and easier. You don’t have to manually download and slice the template with this method.
Here are the steps we need :
- Create a new Laravel project
- Install jeroennoten/Laravel-AdminLTE package
- Modify the template
1. Create a new Laravel project
First things first, let’s create our Laravel project by running this command. (Replace admin-panel with your desired name)
composer create-project laravel/laravel admin-panel2. Install jeroennoten/Laravel-AdminLTE package
Now, cd into your project and run this command to install the package
composer require jeroennoten/laravel-adminlteNow that you have installed the package, what command you run depends on what you intend to do with your project.
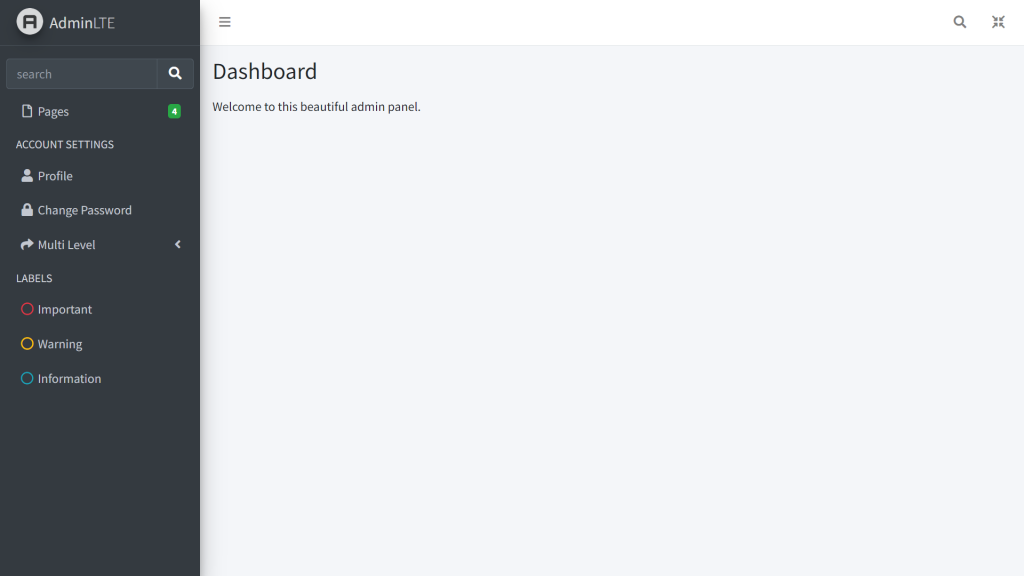
If you intend to have just the dashboard view like below, you can simply run this command to publish the vendor
php artisan adminlte:install
That command basically copies the files (template and dependencies) from the vendor folder to your working project so that it can be used.
That enables you to use the template. You can check this page to see other variations to this command. You can add basic scaffolding for your views and route with other variations. Do keep in mind if you use the authentication scaffolding, you’ll need the laravel/ui package.

3. Modify the template
Now, to make your page looks like the image above, replace your welcome.blade.php with this code
@extends('adminlte::page')

@section('title', 'Dashboard')

@section('content_header')
    <h1>Dashboard</h1>
@stop

@section('content')
    <p>Welcome to this beautiful admin panel.</p>
@stop
Now, your page will look like the image above, go ahead and modify the content as you like.
But, modifying the content won’t be enough, you’d want to modify the title and the navigations too, right?
Go ahead and open config/adminlte.php. Inside that file, you can find all the configurations you need to modify the appearance. For example, go ahead and head to the ‘menu’ part and change one of the navbar items. It should work.
There are still a lot of configurations that you can modify, go ahead and explore it! I believe they are all pretty self explanatory.
Summary
And that’s how you integrate the AdminLTE template with Laravel. I personally prefer this way rather than slicing it manually. This post acts as a supplement to the documentation because although the documentation is helpful, I’m still quite confused at first. I didn’t know what to modify and how to modify the navigations. That’s why I made this post so that you don’t get confused like I did.
Do refer to the documentation whenever you want to find the full options of what you can do with this package.
Now that you understand more about Laravel, if you’re looking for where to host your Laravel App, I recommend Cloudways. It is compatible, fast, reliable and has a specific option for Laravel. There are also tons of resources about Laravel hosting on Cloudways. Go ahead and check it out!
If you’re looking to refresh your PHP skill, you can try Codecademy’s free PHP course. Go ahead and check out the syllabus to see if it fits you. If you’re interested, go and try it for free!
If you are interested about other topics in Laravel, you can check :
- How to Set Up Laravel in Windows
- Laravel Project Structure
- How to Get Location in Laravel Without Google Maps API
- How to Remove a Package in Laravel
- CDN VS Local in Laravel
Now, go explore!
